# 13. PyTorch 笔记
# 1. 安装
安装包比较大,建议先配置清华源,参考第一章 Python 环境🔗
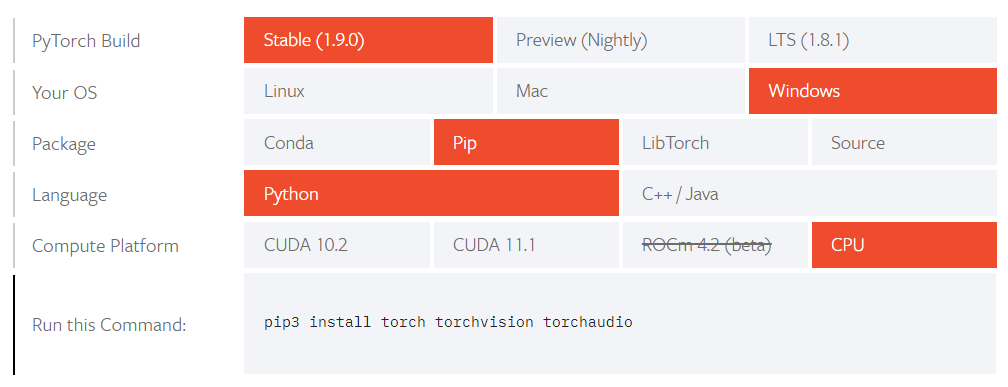
进入 Pytorch 官网的 安装页面🔗 (opens new window), 根据需要选择环境和安装版本

根据生成的命令再本地执行安装
比如根据上图选择的通过 pip 安装的适用于 python 的 cpu 版本 Pytorch
pip3 install torch torchvision torchaudio1使用 gpu 进行训练需要配置 cuda 环境,参考 CUDA 安装🔗
- Tips1: gpu 版本需要先 NVIDIA 显卡并安装 CUDA,最好先根据列出的版本安装对应的 CUDA 版本,比如上图要安装 CUDA11.1,然后复制对应的指令安装相应版本的 torch
- Tips2: 安装包比较大,可以通过 pip 指令列出的地址下载好安装包后,从本地安装
import torch

print(torch.cuda.is_available())    # True 表示可用
# 显示显卡数量
print(torch.cuda.device_count())    # 1 表示只有一块显卡
# 显示当前
print(torch.cuda.current_device())  # 0 表示当前在第一块显卡上
# 显示显卡名
print(torch.cuda.get_device_name(0))    # NVIDIA GeForce MX150

# 实际使用 GPU 进行训练的方法
device = torch.device("cuda:0" if torch.cuda.is_available() else "cpu")  # 有 GPU 就用 GPU, 否则用 CPU

model.to(device)  # 移动模型到 GPU
x_data = x_data.to(device) # 将训练数据放入 GPU
y_data = y_data.to(device) # 将训练数据放入 GPU
out = model(x_data)    # 进行训练
1
2
3
4
5
6
7
8
9
10
11
12
13
14
15
16
17
# 2. 基础使用方法
# 2.1. 数据处理
数据转换
# torch 转 numpy
torch_data.numpy()

# numpy 转 torch
torch_data = torch.FloatTensor(np_data).to(device)
# 或
torch_data = torch.tensor(np_data, dtype=torch.float32, device=device)
1
2
3
4
5
6
7降维
torch.squeeze(input, dim=None, out=None)1numpy 转 tensor
x = torch.from_numpy(x) # numpy 转 tensor1DataLoader 用法
import torch.utils.data as Data

# x, y 分别为数据集的输入和输出
x = torch.from_numpy(x.astype(np.float32))  # numpy 转 tensor.float32
y = torch.from_numpy(y.astype(np.float32))  # numpy 转 tensor.float32

torch_dataset = Data.TensorDataset(x, y)  # 转换成 Torch 能识别的 Dataset
loader = Data.DataLoader(
    dataset=torch_dataset,
    batch_size=batch_size,
    shuffle=True,  # 是否打乱数据
    num_workers=2,  # 多线程读取数据
)
1
2
3
4
5
6
7
8
9
10
11
12
13
# 2.2. 创建模型(以全链接为例)
创建模型方法 1:神经网络层与其他层分开写
class MLP(nn.Module):  # 模型
    def __init__(self):
        super(MLP, self).__init__()  # 继承 nn.Module.__init__()
        # super().__init__()  # 与上面一句等效
        self.nn1 = nn.Linear(10, 100)  # 第一层线性层,输入 10 维,输出 100 维
        self.nn2 = nn.Linear(100, 100)  # 第二层线性层
        self.nn3 = nn.Linear(100, 10)  # 第三层线性层

    def forward(self, x):
        # 第一层
        x = self.nn1(x)  # 线性
        x = torch.relu(x)  # 激活函数
        x = F.dropout(x, p=0.1, training=self.training)  # dropout
        # 第二层
        x = torch.relu(self.nn2(x))  # 另一种写法:线性+激活函数
        x = torch.dropout(x, p=0.1, train=self.training)  # dropout
        # 第三层
        x = torch.dropout(torch.tanh(self.nn3(x)), p=0.1, train=self.training)  # 线性+激活+dropout

        return x

model = MLP()
print(model)
"""
MLP(
(nn1): Linear(in_features=10, out_features=100, bias=True)
(nn2): Linear(in_features=100, out_features=100, bias=True)
(nn3): Linear(in_features=100, out_features=10, bias=True)
)
"""
1
2
3
4
5
6
7
8
9
10
11
12
13
14
15
16
17
18
19
20
21
22
23
24
25
26
27
28
29
30创建模型方法 2:神经网络层与其他层写到一起
import torch.nn as nn

class MLP(nn.Module):  # 模型
    def __init__(self):
        super(MLP, self).__init__()  # 继承 nn.Module.__init__()
        # super().__init__()  # 与上面一句等效

        self.model = nn.Sequential(  # 序列
            nn.Linear(10, 100),  # 第一层线性层,输入 10 维,输出 100 维
            nn.ReLU(),  # 激活函数
            nn.Dropout(0.1),
            nn.Linear(100, 100),  # 第二层线性层
            nn.ReLU(),  # 激活函数
            nn.Dropout(0.1),
            nn.Linear(100, 10),  # 第三层线性层
            nn.ReLU(),  # 激活函数
            nn.Dropout(0.1),
        )

    def forward(self, x):
        x = self.model(x)

        return x

model = MLP()   # 创建模型
print(model)    # 打印模型结构,结果如下:

"""
MLP(
(model): Sequential(
    (0): Linear(in_features=10, out_features=100, bias=True)
    (1): ReLU()
    (2): Dropout(p=0.1, inplace=False)
    (3): Linear(in_features=100, out_features=100, bias=True)
    (4): ReLU()
    (5): Dropout(p=0.1, inplace=False)
    (6): Linear(in_features=100, out_features=10, bias=True)
    (7): ReLU()
    (8): Dropout(p=0.1, inplace=False)
)
"""
1
2
3
4
5
6
7
8
9
10
11
12
13
14
15
16
17
18
19
20
21
22
23
24
25
26
27
28
29
30
31
32
33
34
35
36
37
38
39
40
41
42
# 2.3. 模型保存与加载
保存模型
# 只保存模型参数,体积小,速度快
torch.save(net.state_dict(), 'model_para')

# 保存完整的模型
torch.save(net, 'model_name')
1
2
3
4
5加载模型
map_location 不设置的话,模型会加载到保存模型的设备
# 加载模型参数
model = xxxNet()  # 先创建模型
static_dict = torch.load('model_para', map_location='cuda:0')  # 加载模型参数文件
model.load_state_dict(static_dict)  # 将模型参数加载到模型中

# 加载整个模型
model = torch.load('model_name')
model = torch.load('model_name', map_location=torch.device('cpu'))   # 加载模型到 cpu
1
2
3
4
5
6
7
8
# 3. Torch 模型
# 3.1. 卷积层 Convolution Layers
卷积层:conv2d 二维卷积,卷积动画🔗 (opens new window)
import torch nn as nn
import torch.nn.functional as F

nn.Conv2d(in_channels, out_channels, kernel_size, stride=1, padding=0, dilation=1, groups=1, bias=True, padding_mode='zeros', device=None, dtype=None)
# in_channels: 输入维度
# out_channels: 输出维度
# kernel_size: 内核维度
# stride: 偏移量
# padding: 填充(矩阵边缘填充的维度)

F.conv2d(input, weight, bias=None, stride=1, padding=0)
# input: 输入
# weight: 卷积核
# bias: 偏置(相当于加一个常量)
# stride: 偏移量
# padding: 填充(矩阵边缘填充的维度)
1
2
3
4
5
6
7
8
9
10
11
12
13
14
15
16
17
# 3.2. 池化层 Pooling Layers
池化层:maxpool2d 二维最大池化,减小数据维数,加快训练速度
nn.MaxPool2d(kernel_size, stride=None, padding=0, dilation=1, return_indices=False, ceil_mode=False)
# kernel_size: 池化维度
# stride: 偏移量,默认值=kernel_size
# padding: 填充
# dilation: 空洞卷积
# ceil_mode: True=ceil 模式,false=floor 模式
1
2
3
4
5
6
# 3.3. 线性层 Liner Layers
线性层(全链接)
# in_features: 输入维数
# out_features: 输出维数
# bias: 是否学习偏置量
nn.Linear(in_features, out_features, bias=True, device=None, dtype=None)
1
2
3
4
# 3.4. 激活函数 Non-liner Activations
非线性激活
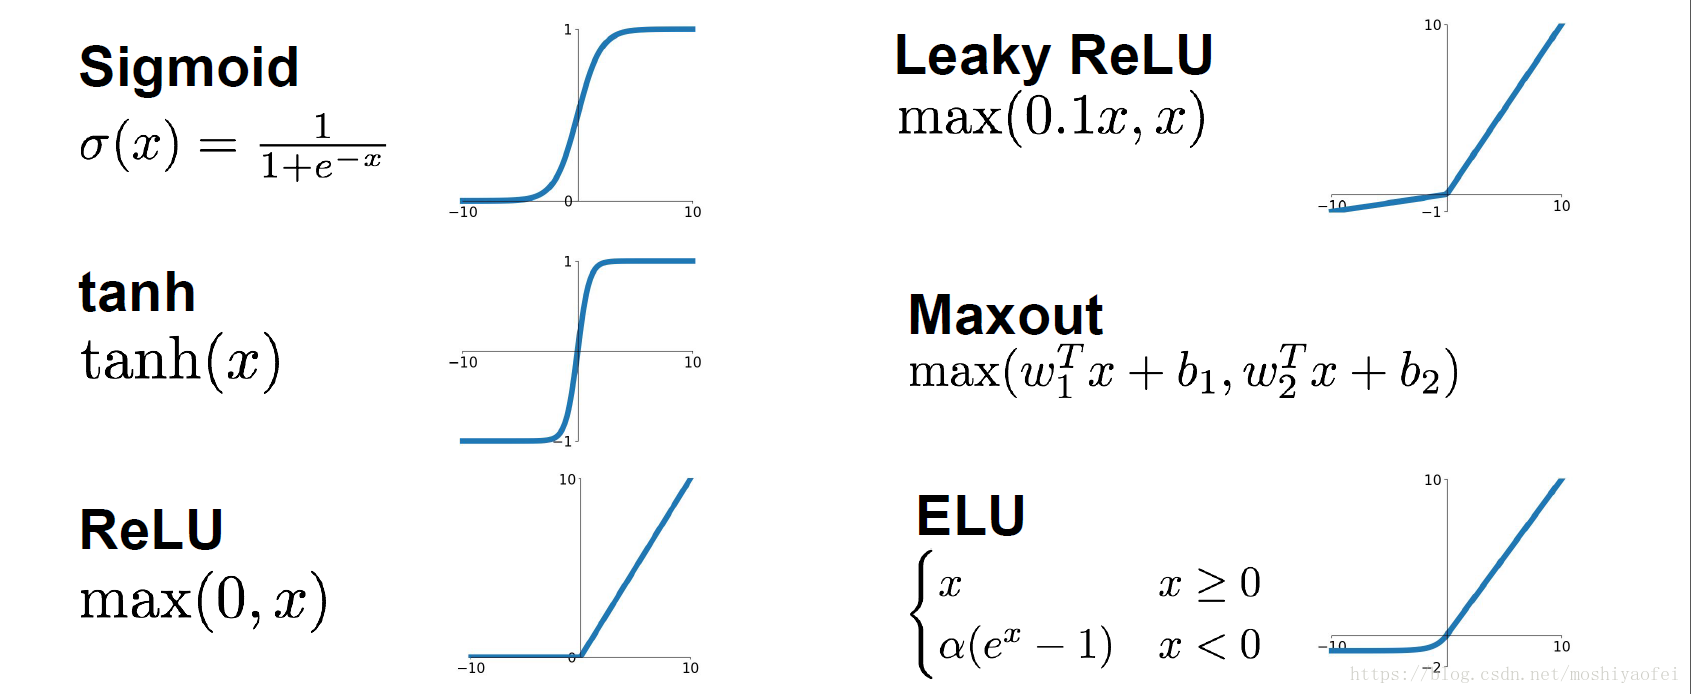
nn.ReLU(inplace=False)   # 0 if x < 0 else x
nn.Sigmoid()
nn.Tanh()
1
2
3
# 3.5. 早停法 EarlyStopping
早停类定义
class EarlyStopping:
    """
    Early stopping to stop the training when the loss does not improve after
    certain epochs.
    """

    def __init__(self, patience=5, min_delta=0):
        """
        :param patience: how many epochs to wait before stopping when loss is
            not improving
        :param min_delta: minimum difference between new loss and old loss for
            new loss to be considered as an improvement
        """
        self.patience = patience
        self.min_delta = min_delta
        self.counter = 0
        self.best_loss = None
        self.early_stop = False

    def __call__(self, val_loss):
        if self.best_loss is None:
            self.best_loss = val_loss
        elif self.best_loss - val_loss > self.min_delta:
            self.best_loss = val_loss
            # reset counter if validation loss improves
            self.counter = 0
        elif self.best_loss - val_loss < self.min_delta:
            self.counter += 1
            print(f"INFO: Early stopping counter {self.counter} of {self.patience}")
            if self.counter >= self.patience:
                print('INFO: Early stopping')
                self.early_stop = True
1
2
3
4
5
6
7
8
9
10
11
12
13
14
15
16
17
18
19
20
21
22
23
24
25
26
27
28
29
30
31
32使用
# 首先在外部定义早停类
early_stopping = EarlyStopping()

# 在 epoch 训练的循环内根据 loss 进行早停,也可以将 loss 换成其他观测值
early_stopping(train_loss)
if early_stopping.early_stop:
    break
1
2
3
4
5
6
7
# 4. 实例
# 4.1. 全链接神经网络
基础 MLP
import torch
import torch.nn as nn
# import torch.nn.functional as F
import torch.utils.data as Data
import pandas as pd
import numpy as np
from sklearn import preprocessing

class MLP(nn.Module):  # 创建 MLP 模型

    def __init__(self):
        super(MLP, self).__init__()  # 继承 nn.Module.__init__()

        self.model = nn.Sequential(  # 序列
            nn.Linear(60, 1000),  # 第一层线性层,输入 60 维,输出 100 维
            nn.ReLU(),  # 激活函数
            nn.Dropout(0.2),
            nn.Linear(1000, 2000),  # 第二层线性层
            nn.ReLU(),  # 激活函数
            nn.Dropout(0.2),
            nn.Linear(2000, 1000),  # 第三层线性层
            nn.ReLU(),  # 激活函数
            nn.Dropout(0.1),
            nn.Linear(1000, 500),  # 第四层线性层
            nn.Tanh(),  # 激活函数
            nn.Linear(500, 60)  # 第五层输出层
        )

    def forward(self, x):
        output = self.model(x)

        return output

def train():
    m_model = MLP()
    m_model.to(device)  # 移动模型到 GPU
    print(m_model)
    lossfunc = nn.MSELoss()  # 损失函数
    optimizer = torch.optim.Adam(m_model.parameters(), learning_rate)  # 优化器

    x, y, y_o = get_data()
    x = torch.from_numpy(x.astype(np.float32))  # numpy 转 tensor
    y = torch.from_numpy(y.astype(np.float32))  # numpy 转 tensor
    torch_dataset = Data.TensorDataset(x, y)  # 转换成 Torch 能识别的 Dataset
    loader = Data.DataLoader(
        dataset=torch_dataset,
        batch_size=batch_size,
        shuffle=True,  # 是否打乱数据
        num_workers=2,  # 多线程读取数据
    )

    for epoch in range(epochs):
        train_loss = 0
        for i, (batch_x, batch_y) in enumerate(loader):
            train_x = batch_x.cuda()
            train_y = batch_y.cuda()
            # print(batch_x.size())
            optimizer.zero_grad()  # 清空上一步的残余更新参数值
            out = m_model(train_x)
            loss = lossfunc(out, train_y)  # 计算误差
            loss.backward()  # 误差反向传播,计算参数更新值
            optimizer.step()  # 将参数更新值施加到 net 的 parameters 上
            train_loss += loss.data

        train_loss = train_loss / len(loader)
        print(f"Epoch {epoch + 1} : Train_loss = {train_loss:.6f}")
1
2
3
4
5
6
7
8
9
10
11
12
13
14
15
16
17
18
19
20
21
22
23
24
25
26
27
28
29
30
31
32
33
34
35
36
37
38
39
40
41
42
43
44
45
46
47
48
49
50
51
52
53
54
55
56
57
58
59
60
61
62
63
64
65
66
# 5. 图神经网络 GNN
# 5.1. 图神经网络基础
图神经网络概述
图卷积网络 (Graph Convolutional Networks) 作为最近几年兴起的一种基于图结构的广义神经网络,因为其独特的计算能力,受到了学术界和工业界的关注与研究。传统深度学习模型如 LSTM 和 CNN 在欧式空间中表现不俗,却无法直接应用在非欧式数据上。为此,研究者们通过引入图论中抽象意义上的“图”来表示非欧式空间中的结构化数据,并通过图卷积网络来提取(graph)的拓扑结构,以挖掘蕴藏在图结构数据中的深层次信息。
图神经网络(Graph Neural Network)是一种专门处理图结构数据的神经网络,目前被广泛应用于推荐系统、金融风控、生物计算中。图神经网络的经典问题主要有三种,包括节点分类、连接预测和图分类三种。🔗 (opens new window)
常见图神经网络
网络 名称 备注 GCN 图卷积网络 适用于无向图,不带边信息 GAT 图注意力网络
# 5.2. 图种类
- 无向图
- 异构图
- 带边信息的图
- 动态图
- 多维图
# 5.3. PyTorch 构建 GNN
GCN
import torch
from torch import nn

class GCN(nn.Module):
    def __init__(self, *sizes):
        super().__init__()
        self.layers = nn.ModuleList([ nn.Linear(x, y) for x, y in zip(sizes[:-1], sizes[1:]) ])
    def forward(self, vertices, edges):
        # ----- 构建邻接矩阵 -----
        # 从自我连接开始
        adj = torch.eye(len(vertices))
        # 边包含连接的定点:[vertex_0, vertex_1]
        adj[edges[:, 0], edges[:, 1]] = 1
        adj[edges[:, 1], edges[:, 0]] = 1
        # ----- 前向数据传递 -----
        for layer in self.layers:
            vertices = torch.sigmoid(layer(adj @ vertices))
            return vertices
1
2
3
4
5
6
7
8
9
10
11
12
13
14
15
16
17
18
# 5.4. 图神经网络库 torch_geometric 安装
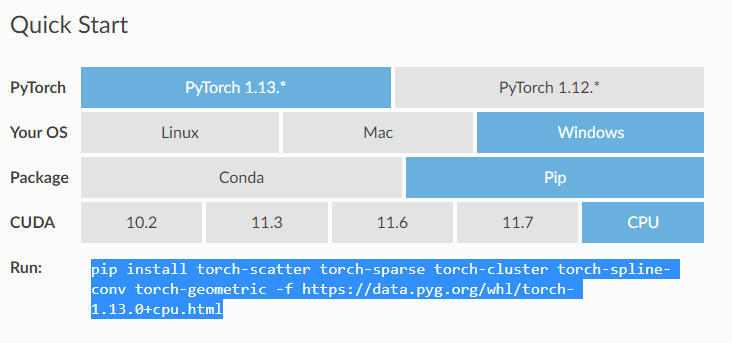
简易方法 [推荐],根据
Quick Start选择相应的版本和系统,复制下面的 pip 指令安装即可,如果没有列出合适的版本,也可以自行修改 pip 指令中的版本号进行安装
如果在
Quick Start没有找到对应版本可以用如下方法- 找到 Installation 界面,点击图片中的
here
- 根据自己的 torch 版本和系统选择相应的文件夹,比如要安装 CPU 版本,torch=1.13.0, 就点击相应的
torch-1.13.0+cpu版本 - 根据 python 版本下载相应的 whl 文件,比如
Windows 平台,python=3.9要找到cp39-win_amd64.whl后缀的文件,需要安装的文件有 4 个:torch_cluster,torch_scatter,torch_sparse,torch_spline_conv, 不过缺少torch-geometric包,还是需要通过一方法的 pip 安装 - 下载完成后,在要安装的 python 环境中用 pip 指令安装
- 找到 Installation 界面,点击图片中的
# 5.5. torch_geometric 使用
数据示例
from torch_geometric.datasets import KarateClub # 引入数据集

dataset = KarateClub()
data = dataset[0]

# x = [样本,每个样本的特征维度], edge_index=[样本关系,关系个数], y=[标签], train_mask=[有无标签]
# 即 [点数,点的特征], [边,边数]
print(data) # Data(x=[34, 34], edge_index=[2, 156], y=[34], train_mask=[34])
1
2
3
4
5
6
7
8论文分类实例(可直接运行,需要下载数据集,数据集无法下载时可手动下载然后放入对应目录)
import torch
import torch.nn as nn
import torch.nn.functional as F
import torch_geometric.nn as gnn
from torch_geometric.datasets import Planetoid
from torch_geometric.transforms import NormalizeFeatures

class GCN(nn.Module):  # 模型
    def __init__(self, hidden):
        super().__init__()
        # 第一层 GCNConv(1433, 16):每个点的特征维度,隐藏层
        self.conv1 = gnn.GCNConv(dataset.num_features, hidden)
        # 第二层 GCNConv(16, 7):隐藏层,输出维度(分类数)
        self.conv2 = gnn.GCNConv(hidden, dataset.num_classes)

    def forward(self, x, edge_index):
        x = self.conv1(x, edge_index)
        x = x.relu()
        x = F.dropout(x, p=0.5, training=self.training)
        x = self.conv2(x, edge_index)

        return x

def train():  # 训练
    model.train()
    optimizer.zero_grad()
    out = model(data.x, data.edge_index)
    loss = criterion(out[data.train_mask], data.y[data.train_mask])
    loss.backward()
    optimizer.step()

    return loss

def test():  # 测试
    model.eval()
    out = model(data.x, data.edge_index)
    pred = out.argmax(dim=1)
    test_correct = pred[data.test_mask] == data.y[data.test_mask]
    test_acc = int(test_correct.sum()) / int(data.test_mask.sum())
    return test_acc

if __name__ == '__main__':
    # 数据集:2708 个节点,每个节点 1433 个特征,10556 条边
    dataset = Planetoid(root='../data/Planetoid', name='Cora', transform=NormalizeFeatures())
    # Data(x=[2708, 1433], edge_index=[2, 10556], y=[2708], train_mask=[2708], val_mask=[2708], test_mask=[2708])
    data = dataset.data
    print(f"data_x shape = {data.x.shape}")  # torch.Size([2708, 1433])
    print(f"edge_index shape = {data.edge_index.shape}")  # torch.Size([2, 10556])

    model = GCN(hidden=16)
    print(model)

    optimizer = torch.optim.Adam(model.parameters(), lr=0.01, weight_decay=5e-4)
    criterion = torch.nn.CrossEntropyLoss()

    for epoch in range(100):
        los = train()
        print(f"Epoch {epoch}, Loss={los:.4f}")

    test_out = test()
    print(f"Test out accuracy: {test_out:.4f}")
1
2
3
4
5
6
7
8
9
10
11
12
13
14
15
16
17
18
19
20
21
22
23
24
25
26
27
28
29
30
31
32
33
34
35
36
37
38
39
40
41
42
43
44
45
46
47
48
49
50
51
52
53
54
55
56
57
58
59
60
61
# 5.6. torch_geometric 数据集
数据集结构
- data.x: 节点属性矩阵,特征 [节点数,节点特征维度]
- data.edge_index:边信息 [2, 边数量]
创建数据集
from torch_geometric.data import Data

# 创建数据集
data = Data(x=torch.from_numpy(feat.astype(np.float32)), edge_index=torch.tensor(edges, dtype=torch.long))
# 给数据集增加新的附加数据,这里增加了训练集的序号和标签,也可自行添加其他数据,名字随意
data.train_index = train[:, 0]
data.train_label = train[:, 1]
1
2
3
4
5
6
7
